Thursday, April 14, 2016
Additional Resources
I have had requests to provide any online resources to supplement the course work and class time.
Below are a few links I think you will find useful:
http://csharp.net-tutorials.com/
Welcome to this C# Tutorial, currently consisting of 49 articles covering all the most important C# concepts. This tutorial is primarily for new users of this great technology, and we recommend you to go through all the chapters, to get the most out of it as possible. While each chapter can be used without reading the previous chapters, some of them may reference things done in earlier chapters.
OOP Related Links:
http://csharp.net-tutorials.com/classes/abstract-classes/
http://csharp.net-tutorials.com/classes/inheritance/
http://csharp.net-tutorials.com/classes/interfaces/
http://www.csharp-station.com/Tutorial/CSharp/SmartConsoleSetup.aspx
Welcome to the C# Station Tutorial This is a set of lessons suited for beginning to intermediate programmers or anyone who would like to gain familiarity with the C# programming language. These lessons will help you get a quick head-start with C# programming.
http://www.c-sharpcorner.com/UploadFile/mkagrahari/introduction-to-object-oriented-programming-concepts-in-C-Sharp/
Introduction to Object Oriented Programming (OOP) concepts in C#: Abstraction, Encapsulation, Inheritance and Polymorphism.
Tuesday, April 12, 2016
Lesson 12
Chapter 13
Concepts:
Exception handling
Specialized exception types (Known Exceptions)
Try Catch Finally
Exception Handling
Chapter 13
The C# language's exception handling features help you deal with any unexpected or exceptional situations that occur when a program is running. Exception handling uses the try, catch, and finally keywords to try actions that may not succeed, to handle failures when you decide that it is reasonable to do so, and to clean up resources afterward. Exceptions can be generated by the common language runtime (CLR), by the .NET Framework or any third-party libraries, or by application code. Exceptions are created by using the throw keyword.
In many cases, an exception may be thrown not by a method that your code has called directly, but by another method further down in the call stack. When this happens, the CLR will unwind the stack, looking for a method with a catch block for the specific exception type, and it will execute the first such catch block that if finds. If it finds no appropriate catch block anywhere in the call stack, it will terminate the process and display a message to the user
The basic exception handling model looks like this:
private void DoSomething()
{
try
{
}
catch (Exception)
{
throw;
}
}
We would first want to implement a couple of changes to the exception template code. In most cases, we would need to assign a variable to the exception object so we can reference it in the exception block.
catch (Exception e)
{
throw;
}
Using the variable "e" (commonly used to represent the exception object). Allows us to access the properties of the exception object when an exception is thrown in our code.
Typically we only want the message value but we can get the complete exception via the ToString() method.
catch (Exception e)
{
MessageBox.Show(e.Message); //only the specific error message
MessageBox.Show(e.ToString()); //the complete exception detail
}
Exceptions can be re-thrown. When a captured exception occurs we can either handle it or pass is back up the call stack. That is back up to the method or property that called it.
catch (Exception e)
{
throw e;
}
The above code will take the exception and pass it back up to the calling method or property.
Known Exceptions
If you know in advance possible exceptions to your process we can implement exception handling to address specific issues
public static double DivideTwoNumber(double Value1, double Value2)
{
try
{
return Value1 / Value2;
}
catch (DivideByZeroException e)
{
//Value 2 might be zero so we can trap for that possibility
Console.WriteLine("Can't divide by zero");
return 0;
}
catch (Exception e)
{
//If an exception occurs that is not a divide by zero exception then it is caught here
throw e;
}
}
In the method above we are going to capture two kinds of exceptions. If the method throws a divide by zero exception the first exception section would catch and process the exception. If the exception is not that then the second method would capture the exception. It is important to note that this kind of exception chaining should be done from the specific exception types to the more general. If the exception blocks in the code were reversed the divide exception would never be reached because the general exception block would catch them all.
Tuesday, March 29, 2016
Useful Links
http://visualstudioshortcuts.com Keyboard shortcuts supported in different versions of visual studio.
https://www.autohotkey.com/ AutoHotkey (AHK) is a free, open-source macro-creation and automation software for Windows that allows users to automate repetitive tasks.
Visual Studio Express Visual Studio Express editions provide free tools to develop applications for a specific platform, such as Windows Universal Platform applications, web sites, and Windows desktop applications
SQL Server Express Take advantage of the same powerful database engine in a version tailored for redistribution and embedding. SQL Server Express includes 10GB of storage per database, easy backup and restore to Microsoft Azure functionality, and compatibility with all editions of SQL Server and Microsoft Azure SQL Database so you can develop and deploy with confidence. Note: I recommend getting the version with the advanced tools. It contains both reporting and management studio.
Lesson 11
Chapter 12
Concepts:
Interface classes
Multiple interfaces
Multiple interfaces
Interface vs Abstraction
Interfaces
Interfaces are contracts that define the minimum set of class capabilities. An interface looks like a class, but has no implementation. The only thing it contains are declarations of events, indexers, methods and/or properties. The reason interfaces only provide declarations is because they are inherited by classes, which must provide an implementation for each interface member declared.
interface iVehicle
{
int Doors { get; set; }
string Style { get; set; }
void SetSpeed();
}
The interface class above "iVehicle" outlines what a class that implements the interface MUST support. This is the contract.
class Car : iVehicle
{
public int Doors
{
get
{
throw new NotImplementedException();
}
set
{
throw new NotImplementedException();
}
}
{
public int Doors
{
get
{
throw new NotImplementedException();
}
set
{
throw new NotImplementedException();
}
}
public string Style
{
get
{
throw new NotImplementedException();
}
set
{
throw new NotImplementedException();
}
}
{
get
{
throw new NotImplementedException();
}
set
{
throw new NotImplementedException();
}
}
public void SetSpeed()
{
throw new NotImplementedException();
}
}
{
throw new NotImplementedException();
}
}
The Car class must satisfy the requirements of the interface but is not limited to only those requirements. The Car class could implement other methods or properties not outlined in the interface. Note: When visual studio implements an interface for you it adds a NotimplementedException() exception to each code snippet it created. This is useful in preventing us from access a generated method or property before we are ready.
Multiple Interfaces
Unlike inheritance a class can implement more that one interface.
Lets' add an engine interface to the solution.
interface iEngine
{
int Cylinders { get; set; }
string FuelType { get; set; }
}
{
int Cylinders { get; set; }
string FuelType { get; set; }
}
We can then add this interface to the Car class by adding the iEngine interface to the car class the class must now support the engine requirements in addition to the vehicle interface.
class Car : iVehicle, iEngine
{
public int Doors
{
get
{
throw new NotImplementedException();
}
set
{
throw new NotImplementedException();
}
}
{
public int Doors
{
get
{
throw new NotImplementedException();
}
set
{
throw new NotImplementedException();
}
}
public string Style
{
get
{
throw new NotImplementedException();
}
set
{
throw new NotImplementedException();
}
}
{
get
{
throw new NotImplementedException();
}
set
{
throw new NotImplementedException();
}
}
public void SetSpeed()
{
throw new NotImplementedException();
}
{
throw new NotImplementedException();
}
public int Cylinders
{
get
{
throw new NotImplementedException();
}
set
{
throw new NotImplementedException();
}
}
{
get
{
throw new NotImplementedException();
}
set
{
throw new NotImplementedException();
}
}
public string FuelType
{
get
{
throw new NotImplementedException();
}
set
{
throw new NotImplementedException();
}
}
}
{
get
{
throw new NotImplementedException();
}
set
{
throw new NotImplementedException();
}
}
}
Interfaces vs Abstraction
A class can only inherit from 1 abstract class at a time. A class can support (implement) many interfaces.
An abstract class can contain code as well as code requirements. An interface cannot contain any implementation
An abstract class can contain private variables and methods. An interface only contains public code.
Lesson 10
Labs
Problem 1:

12.10 (Shape Hierarchy) Implement the Shape hierarchy of Fig. 11.3. Omit the Triangle and Tetrahedron classes. Each TwoDimensionalShape should contain read-only abstract property Area to calculate the area of the two-dimensional shape. Each ThreeDimensionalShape should have readonly abstract properties Area and Volume to calculate the surface area and volume, respectively, of the three-dimensional shape. Create an app that uses an array of Shape references to objects of each concrete class in the hierarchy. Display a text description of the object to which each array element refers. Also, in the loop that processes all the shapes in the array, determine whether each shape is a TwoDimensionalShape or a ThreeDimensionalShape. If a shape is a TwoDimensionalShape, display its area. If a shape is a ThreeDimensionalShape, display its area and volume.
Problem 2:
Build the following:
Tuesday, March 15, 2016
Lesson 9
Outline
Chapter 12
Abstract Class
A C# abstract class contains abstract members which define what a derived should contain. These abstract members only declare that a member of a particular type is required, it does not implement the member. Implementation of abstract members takes place within the derived class. If a subclass which derives from an abstract class and fails to implement abstract methods will fail to compile.
In an abstract class, the abstract methods and abstract procedures are described but not defined.
abstract class Sample
{
public abstract int MyProperty { get; set; }
public abstract void DoSomething();
}
Note the addition of the keyword "abstract" in describing the class, property and method. It will be the responsibility of a derived class to implement the functionality described in the abstracted class.
class ImplementedSample : Sample
{
public override int MyProperty
{
get
{
throw new NotImplementedException();
}
set
{
throw new NotImplementedException();
}
}
public override void DoSomething()
{
throw new NotImplementedException();
}
}
When inheriting from an abstract class the concrete class must implement the design of the abstract class. A wizard can appear over the abstracted class name and stub out the abstraction requirements for us. Visual studio adds the NotImplementedException to remind us that the method or property code has not been defined.
An abstracted class can implement functionality as well that can be derived.
abstract class Sample
{
public abstract int MyProperty { get; set; }
public abstract void DoSomething();
public void DoSomethingElse()
{
//This is where I would put code
}
}
The DoSomethingElse() method has code and is functional. Any derived class can call this method. The method functionality cannot be changed in the derived class.
Virtual
So far we have only looked at abstract class members. As discussed above an abstract member is not implemented in the base class and must be implemented in derived classes in order for the class to compile.
Another type of member is a virtual member. A member defined as virtual must be implemented in the base class, but may be optionally overridden in the derived class if different behavior is required.
Lets add a virtual method to the abstract class.
abstract class Sample
{
public abstract int MyProperty { get; set; }
public abstract void DoSomething();
public void DoSomethingElse()
{
//This is where I would put code
}
public virtual void StillDoSomethingElse()
{
//This code can the overridden and changed in the derived class.
//If not overridden, then this code will run when the method is called.
}
}
Introducing the virtual keyword allows us to change the behavior of the method downstream in a derived class.
Lets look at the implementation.
class ImplementedSample : Sample
{
public override int MyProperty
{
get
{
throw new NotImplementedException();
}
set
{
throw new NotImplementedException();
}
}
public override void DoSomething()
{
throw new NotImplementedException();
}
public override void StillDoSomethingElse()
{
//By using the override keyword on this method
//the code here will run instead of the base abstract method code
}
}
By allowing us to change the behavior of the method through overriding each derived class can use its own implementation of the virtual method or default to the method as defined.
Implementing abstract classes allow us to define behavior in the derived classes and implement behavior change when necessary.
Tuesday, March 8, 2016
Lesson 8
Outline
Chapter 12
Polymorphism
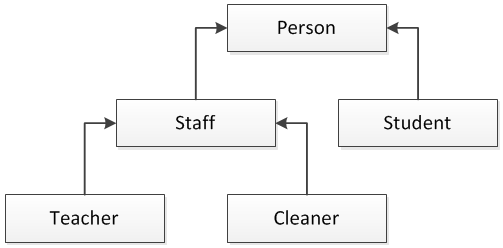
Another primary concept of object-oriented programming is Polymorphism. It allows you to invoke derived class methods through a base class reference during run-time. This is handy when you need to assign a group of objects to an array and then invoke each of their methods. They won't necessarily have to be the same object type.
In a previous lesson we discussed the inheritance aspects of the diagram above. Below is the code that supports the diagram above with a few properties to illustrate polymorphic behavior.
class Person
{
public string FirstName { get; set; }
public string LastName { get; set; }
public string FullName
{
get { return FirstName + " " + LastName; }
}
}
class Staff : Person
{
public int PayGrade { get; set; }
}
class Student : Person
{
public string Major { get; set; }
}
class Teacher : Staff
{
public string OfficeLocation { get; set; }
}
class Cleaner : Staff
{
public int WeeklyHours { get; set; }
}
Polymorphism allows one object to "behave" like another in its inheritance tree. So in the above hierarchy a "teacher" object could behave like a "staff" object.
Suppose we had a method that took a staff object:
public class Utilities
{
public void WorkWithStaff(Staff staffMember)
{
PayGrade = 5;
}
}
We could do the following:
Staff myStaff = new Staff();
Utilities myUtil = new Utilities();
myUtil.WorkWithStaff(myStaff);
Since myStaff is of type Staff then we can pass that object in as a parameter to our method. But due to the rules of polymorphism we can do this too:
Teacher myTeacher = new Teacher();
Utilities myUtil = new Utilities();
myUtil.WorkWithStaff(myTeacher );
Because Teacher has Staff in the object inheritance tree we can do this. Note, this only works upstream so Teacher can be Staff but Staff cannot be Teacher.
Also, while in the method WorkWithStaff, all objects passed into the method will behave as a staff object. In other words, inside the method we would not be able to access any of the Teacher attributes.
Polymorphism is a big topic. We will revisit this topic in a future lesson..
Chapter 12
Polymorphism
Another primary concept of object-oriented programming is Polymorphism. It allows you to invoke derived class methods through a base class reference during run-time. This is handy when you need to assign a group of objects to an array and then invoke each of their methods. They won't necessarily have to be the same object type.
In a previous lesson we discussed the inheritance aspects of the diagram above. Below is the code that supports the diagram above with a few properties to illustrate polymorphic behavior.
class Person
{
public string FirstName { get; set; }
public string LastName { get; set; }
public string FullName
{
get { return FirstName + " " + LastName; }
}
}
class Staff : Person
{
public int PayGrade { get; set; }
}
class Student : Person
{
public string Major { get; set; }
}
class Teacher : Staff
{
public string OfficeLocation { get; set; }
}
class Cleaner : Staff
{
public int WeeklyHours { get; set; }
}
Polymorphism allows one object to "behave" like another in its inheritance tree. So in the above hierarchy a "teacher" object could behave like a "staff" object.
Suppose we had a method that took a staff object:
public class Utilities
{
public void WorkWithStaff(Staff staffMember)
{
PayGrade = 5;
}
}
We could do the following:
Staff myStaff = new Staff();
Utilities myUtil = new Utilities();
myUtil.WorkWithStaff(myStaff);
Since myStaff is of type Staff then we can pass that object in as a parameter to our method. But due to the rules of polymorphism we can do this too:
Teacher myTeacher = new Teacher();
Utilities myUtil = new Utilities();
myUtil.WorkWithStaff(myTeacher );
Because Teacher has Staff in the object inheritance tree we can do this. Note, this only works upstream so Teacher can be Staff but Staff cannot be Teacher.
Also, while in the method WorkWithStaff, all objects passed into the method will behave as a staff object. In other words, inside the method we would not be able to access any of the Teacher attributes.
Polymorphism is a big topic. We will revisit this topic in a future lesson..
Tuesday, February 16, 2016
Lesson 7
Outline
Chapter 11
Inheritance Continued (Lab)
Chapter 11
Inheritance Continued (Lab)
Problem 11.7 & 11.8
11.7 (Quadrilateral Inheritance Hierarchy) Write an inheritance hierarchy for classes Quadrilateral, Trapezoid, Parallelogram, Rectangle and Square. Use Quadrilateral as the base class of the hierarchy. Make the hierarchy as deep (i.e., as many levels) as possible. Specify the instance variables, properties and methods for each class. The private instance variables of Quadrilateral should be the x–y coordinate pairs for the four endpoints of the Quadrilateral. Write an app that instantiates objects of your classes and outputs each object’s area (except Quadrilateral).
11.8 (Account Inheritance Hierarchy) Create an inheritance hierarchy that a bank might use to represent customers’ bank accounts. All customers at this bank can deposit (i.e., credit) money into their accounts and withdraw (i.e., debit)money from their accounts. More specific types of accounts also exist. Savings accounts, for instance, earn interest on the money they hold. Checking accounts, on the other hand, charge a fee per transaction.
Create base class Account and derived classes SavingsAccount and CheckingAccount that inherit from class Account. Base class Account should include one private instance variable of type decimal to represent the account balance. The class should provide a constructor that receives an initial balance and uses it to initialize the instance variable with a public property. The property should validate the initial balance to ensure that it’s greater than or equal to 0.0; if not, throw an exception. The class should provide two public methods. Method Credit should add an amount to the current balance. Method Debit should withdraw money from the Account and ensure that the debit amount does not exceed the Account’s balance. If it does, the balance should be left unchanged, and the method should display the message "Debit amount exceeded account balance." The class should also provide a get accessor in property Balance that returns the current balance.
Derived class SavingsAccount should inherit the functionality of an Account, but also include a decimal instance variable indicating the interest rate (percentage) assigned to the Account. SavingsAccount’s constructor should receive the initial balance, as well as an initial value for the interest rate. SavingsAccount should provide public method CalculateInterest that returns a decimal indicating the amount of interest earned by an account. Method CalculateInterest should determine this amount by multiplying the interest rate by the account balance. [Note: SavingsAccount should inherit methods Credit and Debit without redefining them.]
Derived class CheckingAccount should inherit from base class Account and include a decimal instance variable that represents the fee charged per transaction. CheckingAccount’s constructor should receive the initial balance, as well as a parameter indicating a fee amount. Class Checking-Account should redefine methods Credit and Debit so that they subtract the fee from the account balance whenever either transaction is performed successfully. CheckingAccount’s versions of these methods should invoke the base-class Account version to perform the updates to an account balance.
CheckingAccount’s Debit method should charge a fee only if money is actually withdrawn (i.e., the debit amount does not exceed the account balance). [Hint: Define Account’s Debit method so that it returns a bool indicating whether money was withdrawn. Then use the return value to determine whether a fee should be charged.]
After defining the classes in this hierarchy, write an app that creates objects of each class and tests their methods. Add interest to the SavingsAccount object by first invoking its CalculateInterest method, then passing the returned interest amount to the object’s Credit method.
Lesson 6
Outline
Chapter 11
Inheritance Continued
Diagraming
Is-A relationship
Constructors
Protected
Problem 11.5
Protected
Problem 11.5
(Shape Inheritance Hierarchy) The world of shapes is much richer than the shapes included in the inheritance hierarchy of Fig. 11.3. Write down all the shapes you can think of—both two-dimensional and three-dimensional—and form them into a more complete Shape hierarchy with as many levels as possible. Your hierarchy should have class Shape at the top. Class TwoDimensionalShape and class ThreeDimensionalShape should extend Shape. Add additional derived classes, such as Quadrilateral and Sphere, at their correct locations in the hierarchy as necessary.
Diagraming
In the previous lesson, we learned about base and derived classes where the base class is the parent class and the derived class is the child class. A derived class can only have one base class. In order for a derived class to inherit from more than one base class the current base class would need to inherit from second class. However, a base class can have many derived classes.
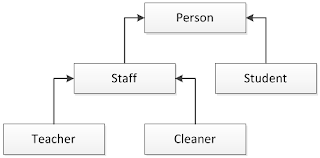
In the example below, we have a simple diagram outlining a series of classes and their inherited relationship. The top class Person is the root base class for all the other classes. All of the other classes in the inheritance diagram have the public and internal capabilities specified in the Person class.
The Staff base class has two derived classes (Teacher and Cleaner). Both will have the same capabilities outlined in the Staff class but can also contain separate properties and methods specific to their own class. In an inheritance diagram the arrows point back to the base class.
Is-A
Is-A is a phrase used to describe inherited relationships. In the previous diagram, you can say Staff Is-A Person and Teacher Is-A Staff. This relationship only works up the inheritance hierarchy. We can say Teacher is a Staff but cannot say staff is a teacher. So all teachers are staff but not all staff are teachers.
Constructors
Earlier in the lessons we talked about class constructors and their ability to accept values passed into the class when the class is instantiated into an object.
Suppose the staff class did not have a default constructor and only supported constructors that took one or more values?
class Staff
{
    private readonly string payGrade = string.Empty;

    public Staff(string payGrade)
    {
        //Update private variable to specified pay grade
        this.payGrade = payGrade;
    }
}
Our Teacher class is derived from the Staff class.
class Teacher:Staff
{

}
This will cause an exception. Since Staff cannot be created without the pay grade parameter the Teacher class must have at least one constructor to support the Staff class requirement.
class Teacher:Staff
{

    public Teacher(string payGrade)
        : base(payGrade)
    { }

}
The Teacher class accepts the parameters via its constructor and then passes it to the base class (Staff) via the : base. The "base" refers to the current class base class. The Teacher class can still accept its own parameters.
private string className = string.Empty;

public Teacher(string className, string payGrade)
    : base(payGrade)
{
    this.className = className;
}
In the example above, the Teacher class accepts two parameters (className and payGrade). Pay grade is passed to the base constructor and the class name is handled locally within the Teacher class. Note: the sequence of the parameters does not play a factor. It would have been acceptable to reverse the order of the parameters.
Lets extend our Teacher class to support multiple constructors.
class Teacher:Staff
{
    private string className = string.Empty;
    private string firstName = string.Empty;
    private string lastName = string.Empty;

    public Teacher(string className, string payGrade)
        : base(payGrade)
    {
        this.className = className;
    }

    public Teacher(string firstName, string lastName, string className, string payGrade): this(className, payGrade)
    {
        this.firstName = firstName;
        this.lastName = lastName;
    }

}
The Teacher class now supports to separate constructors to instantiate the class into a object but only one constructor references the base class. With the use of constructor chaining we can call the other Teacher constructor and pass in the values collected from this constructor. Constructor chaining is acceptable as long as ultimately the base class constructor require is satisfied.
Protected
Private and Protected are very similar. Both cannot be accessed via an instantiated object. Both can be seen by their peer methods within the same brackets "{}". However, there is one main distinction. Private variables and methods can only be seen within the class. Protected variables and methods can be referenced in the derived class.
class Staff
{
    private readonly string payGrade = string.Empty;
    protected int Age;

    public Staff(string payGrade)
    {
        //Update private variable to
        this.payGrade = payGrade;
    }
}
class Teacher:Staff
{
    private string className = string.Empty;
    private string firstName = string.Empty;
    private string lastName = string.Empty;

    public Teacher(string className, string payGrade)
        : base(payGrade)
    {
        this.className = className;
    }

    public Teacher(string firstName, string lastName, string className, string payGrade): this(className, payGrade)
    {
        this.firstName = firstName;
        this.lastName = lastName;
        Age = 27;
    }
}
The Age variable is accessible in the Teacher class due to the protected description. Note: Protected is only accessible in the immediate derived class. In the diagram at the top, should Person have a protected variable or method, it would be accessible in the Staff class but NOT in the Teacher or Cleaner class.
Lesson 5
Chapter 11
Inheritance
Base Classes
Derived Classes
Inheritance
Inheritance enables you to create new classes that reuse, extend, and modify the behavior that is defined in other classes. The class whose members are inherited is called the base class, and the class that inherits those members is called the derived class. A derived class can have only one direct base class. However, inheritance is transitive. If ClassC is derived from ClassB, and ClassB is derived from ClassA, ClassC inherits the public or internal members declared in ClassB and ClassA.
Each derived class is generally a specific version of the parent or base class. If we created a Vehicle class and then derived Car class from Vehicle class. The Car class would have access to all public or internal properties and methods of the Vehicle class.
public class Vehicle
{public int NumberOfDoors { get; set; }
public string Transmission { get; set; }
}
public class Car : Vehicle
{public bool Convertable { get; set; }
public bool HasTrunk { get; set; }
}
Class inheritance is denoted by a colon (:) separating the current class name from the base class name. public class Car : Vehicle tells us that Car is derived from Vehicle. Vehicle is the base class and Car is the derived class. Since the Car class is derived from Vehicle we can say that all Cars are Vehicles but not all Vehicles are Cars. Inheritance only works downstream and inheriting a base class does not change the base class. But any change to the base class will be reflected in the derived class.
Car myCar = new Car();
myCar.Convertable = true;
myCar.NumberOfDoors = 2;Above we created an instance of the Car class and called the object myCar. We then changed the property values of myCar. If you look closely, we changed the convertible property value which is located in the Car class and then changed the property value of the NumberOfDoors property from the Vehicle class. The code looks exactly the same. The myCar class does not care which level a property or method is defined only whether it is available (public or internal) or not (private).
Multiple class can be derived
We can create multiple classes based on a parent class.
public class Car : Vehicle
{public bool Convertable { get; set; }
public bool HasTrunk { get; set; }
}
public class Truck : Vehicle
{public bool TowPackage { get; set; }
public bool FourWheelDrive { get; set; }
}
Both of the above classes are derived from the same class (Vehicle), Even though they contain different properties they have the same base class. It can be read like this "All cars are vehicles but not all vehicles are cars"
Base Classes
A base class is a class that is used to create, or derive, other classes. Classes derived from a base class are called child classes, subclasses or derived classes. A base class does not inherit from any other class and is considered parent of a derived class.
The base class forms the means by which inheritance is accomplished through derivation. A class derived from a base class inherits both data and behavior. For example, vehicle can be a base class from which the derived classes car and bus can be derived. Both car and bus are vehicles, and they each represent their own specializations of base class.
Base class helps to create a specialized class that can reuse the code that is implicitly gained from the base class (except constructors and destructors) and extend the functionality of base class by adding or overriding members relevant to derived class in derived class. In C#, events are declared in base class that can be raised from derived classes. Generic classes that are used to encapsulate operations that are not specific to a particular data type serve as base classes, providing generic behavior so as to achieve flexibility and code reusability.
Derived Classes
A derived class is a class created, or derived from another existing class. The existing class from which the derived class gets created through inheritance is known as base or super class.
While inheriting from base class, the derived class implicitly inherits all the members (except constructors and destructors) which it reuses, extends and modifies the behavior of the base class. The derived class overrides the properties and methods of the base class so that it represents the specialized version of base class. C# provides ability to override and hide methods of base class in derived class which makes both classes to evolve freely and maintain binary compatibility.
Inheritance is one of the key functionalities required for all object oriented programming languages.
Subscribe to:
Comments (Atom)